7 Mistakes to Avoid When Planting Cucumbers

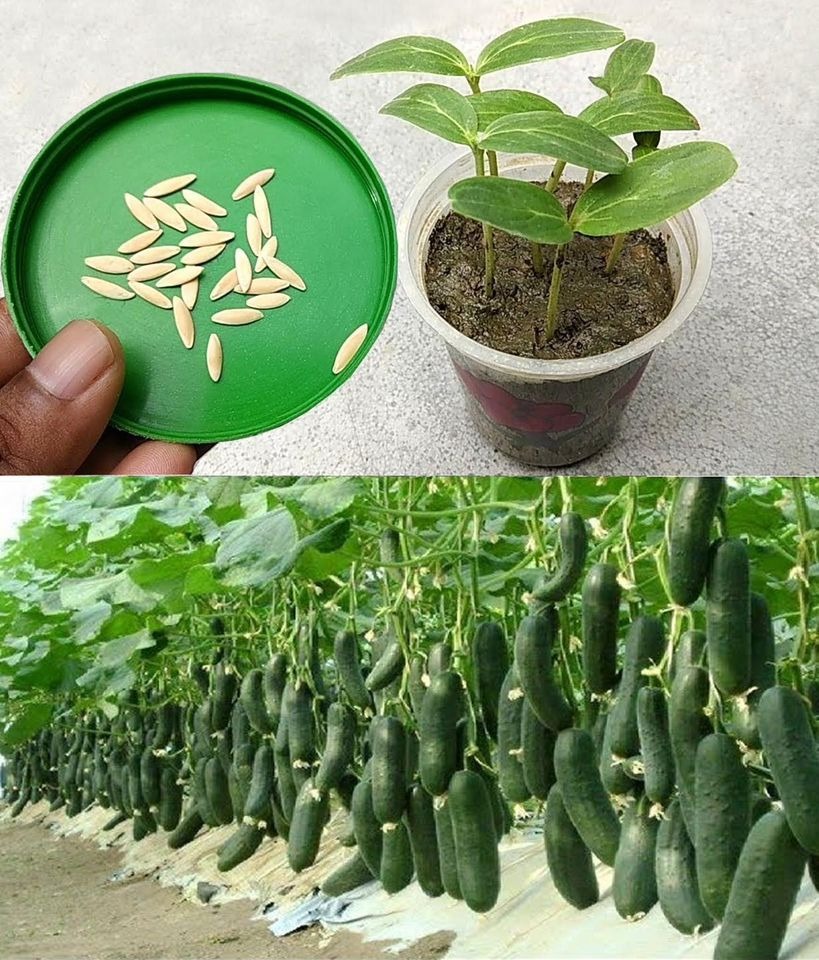
Growing cucumbers can be a rewarding experience for any gardener, but it’s easy to make mistakes that can hinder your plants’ growth and yield. To ensure a bountiful harvest, here are seven common mistakes to avoid when planting cucumbers, combined with detailed insights from various sources.

Using the Wrong Soil
Importance of Soil pH: Cucumbers thrive in neutral pH soil, around 7.0. If your soil is too acidic, your cucumber plants may struggle.
Soil Preparation: Mix soil with manure to create optimal growing conditions. The soil should be moist but not waterlogged and have enough room for plant growth.
soil preparation for planting cucumbers
Ignoring Temperature Requirements
Ideal Growing Temperature: Different cucumber varieties have varying temperature needs. For example, long salad cucumbers require warmer conditions than pickling cucumbers.
Soil Temperature: Wait until your soil has warmed to at least 55 degrees Fahrenheit before planting. Using black mulch can help warm your soil more quickly.

Read more

The trick to cleaning the oven “effortlessly”. Even the burned fat disappears

The oven is arguably one of the most difficult household appliances to clean.

Indeed, traces of splashes and food residues accumulate after each cooking and clog its walls.

Fortunately, there is a simple method to eliminate them effortlessly.

Over time, the oven accumulates a significant amount of dirt and grease stains. Due to lack of time or will, its cleaning is often postponed or even neglected.

As a result, food residues stick to the inner walls of the oven and it becomes very difficult to remove them. And as with all appliances, when maintenance is poorly done, performance cannot be optimal.

How to clean the oven?

If you want to continue preparing roasted dishes without having to spend hours cleaning the oven, the secret is to apply the following trick.

This is based on the use of a laundry product that has proven itself in terms of cleaning.

Clean the oven with a dishwasher cap:

Due to its degreasing and sanitizing properties, dishwasher tablets remain an effective cleaning solution for the oven. To enjoy its many virtues, simply place a capsule on a baking sheet or heat-resistant dish.

Then pour boiling water over the product and place the container in the oven preheated to 100°C. Leave on for an hour, keeping the oven door closed. The capsule will thus begin to melt and diffuse a cleaning vapor inside the oven.

Thanks to the resulting steam, droplets are deposited on the walls of the oven and soften stubborn dirt and food residues that will peel off more easily

All you have to do is wipe a damp cloth to complete the cleaning. For an impeccable result, run a clean cloth again.

Dishwasher tablets are designed to treat dirt at high temperatures. So it’s no wonder it works to clean the oven!

There are several methods to get rid of dirt inside the oven. These offer an excellent alternative to chemical cleaning products. Here are a few examples.

Read more

Homemade “Bombs” To Clean The Toilet In 5 Minutes

Maintaining a fresh and clean toilet is a non-negotiable aspect of a hygienic home. However, simply flushing the toilet doesn’t guarantee a germ-free bowl, as bacteria and viruses can linger on the porcelain. Fear not! You can create homemade cleaning bombs that effectively tackle odors and leave your toilet spotless. With simple ingredients and easy steps, you’ll transform your bathroom cleaning routine. Let’s dive into creating these powerful DIY toilet cleaning bombs.


Ingredients:

  • 1 cup of baking soda
  • ¼ cup citric acid
  • 1 tablespoon of liquid detergent
  • 10 drops of lemon essential oil
  • 15 drops of peppermint essential oil

Instructions:

  1. Mixing the Ingredients:
    • In a container, combine baking soda and citric acid.
    • Add liquid detergent to the dry mixture.
    • Carefully incorporate lemon essential oil into the mixture.
    • Follow with peppermint essential oil, ensuring it’s the last addition to prevent citric acid reactions.
  2. Adjusting Consistency:
    • Stir the mixture thoroughly.
    • If the consistency feels too dry, add a few drops of water to achieve a moldable paste.
    • Ensure that all ingredients are well-integrated.
  3. Molding the Bombs:
    • Transfer the paste into a mold of your choice, forming individual cleaning bombs.
    • Allow the bombs to dry completely in a cool, dry, and dark place.

Read more

The 5 Effective Ways To Clean Your Glass Stovetop

A glass stovetop adds a sleek and modern touch to any kitchen, but it can be a bit challenging to keep clean. Spills, splatters, and burnt-on residue can quickly mar its pristine appearance. However, with the right techniques and a little elbow grease, you can maintain a sparkling glass stovetop. Here are five effective ways to clean it:

1. Warm Soapy Water and a Cloth:

One of the simplest and gentlest methods to clean your glass stovetop is using warm soapy water and a soft cloth. Here’s what to do:
Step 1: Ensure your stovetop has cooled down completely before cleaning.
Step 2: Fill a basin with warm water and add a few drops of mild dish soap.
Step 3: Dip a soft cloth or sponge into the soapy water and wring it out until it’s damp but not dripping.
Step 4: Gently wipe down the stovetop, paying extra attention to any stubborn spots.
Step 5: Rinse the cloth in clean water, wring it out, and wipe down the stovetop again to remove any soap residue.
Step 6: Dry the stovetop with a clean, dry cloth to prevent streaks.
2. Baking Soda and Vinegar:

Baking soda is an excellent mild abrasive cleaner, and when combined with vinegar, it creates a powerful cleaning solution. Here’s how to use it:
Step 1: Sprinkle a generous amount of baking soda evenly over the stovetop.
Step 2: Spray white vinegar over the baking soda until it fizzes.
Step 3: Let the mixture sit for 15-20 minutes to loosen up grime.
Step 4: Use a soft cloth or sponge to scrub the stovetop in a circular motion.
Step 5: Rinse the stovetop with clean water and dry it with a cloth.
3. Commercial Glass Stovetop Cleaner:

Read more