Lunch & Dinner
Air Fryer Garlic Butter Melting Potatoes
High-Protein Cottage Cheese Sticks
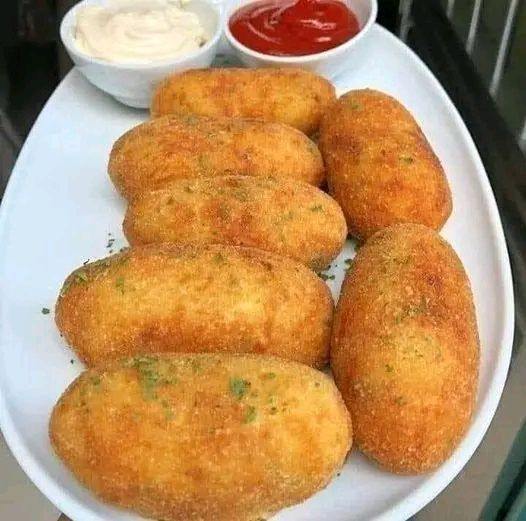
When it comes to snacking, most of us crave something crispy, flavorful, and satisfying—but we also want it to be healthy and protein-rich. That’s exactly where Cottage Cheese Sticks come in. This recipe is the perfect fusion of crunchy and creamy textures, offering a nutritious twist on traditional cheese sticks. Instead of using heavy mozzarella or processed cheese, we use cottage cheese as the star ingredient. The result? A lighter, protein-packed snack that you can enjoy guilt-free.
Whether you’re looking for a quick after-school treat for kids, a crowd-pleasing party appetizer, or a high-protein side dish to complement your salad, these Cottage Cheese Sticks deliver on all fronts.
Health Benefits of Cottage Cheese Snacks
Cottage cheese is often called a superfood for weight loss and muscle gain, and for good reason. Here’s why it makes these sticks not only tasty but also nutrient-rich:
High in Protein – Cottage cheese contains casein protein, which digests slowly, keeping you full for longer.
Low in Calories – Compared to regular cheese sticks, these are lighter but just as satisfying.
Rich in Calcium – Essential for strong bones and teeth.
Great for Low-Carb Diets – When baked, these sticks can fit easily into a keto or low-carb lifestyle.
Versatile Flavor – The mild taste of cottage cheese pairs well with spices, dips, and sauces.
Ingredients Breakdown – What Makes This Recipe Work
Let’s look at each ingredient and how it contributes to the final taste and texture of your cottage cheese sticks.
Cottage Cheese (1 cup) – Provides the creamy, tangy base with a protein boost. Be sure to drain it well to avoid soggy sticks.
Breadcrumbs (1 cup) – Create a golden, crunchy coating. Panko breadcrumbs make them extra crispy.
Egg (1, beaten) – Acts as a binder, helping the coating stick firmly.
All-Purpose Flour (½ cup) – Ensures an even base layer for dredging.
Garlic Powder (½ tsp) – Adds a savory kick that enhances the cheesy flavor.
Paprika (½ tsp) – Brings a smoky, slightly spicy note.
Salt & Black Pepper (to taste) – Balance out the flavor.
Oil for Frying / Cooking Spray for Baking – Your choice depends on whether you want indulgent fried sticks or a lighter baked version.
Step-by-Step Instructions – Making Cottage Cheese Sticks at Home
Step 1: Prepare Your Dredging Station
Set up three shallow bowls:
Flour in one.
Beaten egg in the second.
Breadcrumbs mixed with garlic powder, paprika, salt, and pepper in the third.
This organized setup makes coating the sticks quick and mess-free.
Step 2: Shape the Cottage Cheese
Drain cottage cheese thoroughly using a strainer or cheesecloth. Scoop small portions and shape them into stick-like pieces. If the mixture feels too soft, you can mix in a tablespoon of flour or grated Parmesan to firm it up.
Step 3: Coat the Cheese Sticks
Roll each stick in flour → dip in egg → coat with seasoned breadcrumbs. For extra crunch, repeat the egg + breadcrumb step twice for a double coating.
Step 4: Cook to Perfection
You can either fry or bake depending on your preference:
Frying: Heat oil in a pan and fry the sticks for 2–3 minutes per side until golden brown.
Baking: Preheat oven to 400°F (200°C). Arrange sticks on a parchment-lined baking sheet, spray lightly with cooking oil, and bake for 15–20 minutes, flipping halfway.
Step 5: Serve with Your Favorite Dip
These sticks taste amazing with ketchup, marinara sauce, garlic aioli, ranch dressing, or even a tangy yogurt dip.
Serving Ideas – Make Your Snack More Exciting
As a Party Appetizer: Arrange them on a platter with multiple dipping sauces for variety.
Kid-Friendly Snack: Pair with honey mustard or mild ketchup for picky eaters.
Healthy Lunchbox Addition: Pack a few baked sticks with a small dip container for a balanced school or work meal.
Side Dish Upgrade: Serve alongside fresh salads, soups, or grilled meats.
Pro Tips for the Best Cottage Cheese Sticks
Drain Well: Excess liquid can cause your sticks to fall apart.
Use Panko: For a restaurant-style crunch.
Add Cheese Mix: Blend in Parmesan or cheddar for a richer taste.
Air Fryer Option: Cook at 375°F (190°C) for 12–15 minutes for a low-oil, crispy finish.
Spice Variations: Try chili flakes, Italian seasoning, or cumin for different flavor profiles.
Flavor Variations – Customize to Your Taste
Herb-Infused – Add dried oregano, thyme, or rosemary to the breadcrumb mix.
Cheesy Blend – Mix in shredded mozzarella or cheddar with cottage cheese.
Spicy Kick – Add cayenne or chili powder for a bolder snack.
Low-Carb Version – Swap breadcrumbs with almond flour or crushed pork rinds.
Gluten-Free Option – Use gluten-free breadcrumbs or cornmeal.
Why This Recipe Works for Meal Prep
These cottage cheese sticks are ideal for batch cooking. Simply prepare, coat, and freeze them before cooking. When you’re ready to enjoy, fry, bake, or air fry straight from the freezer—no thawing required.
Pairing Suggestions
To make your snack time more enjoyable, try pairing these with:
Beverages: Lemon iced tea, sparkling water, or light beer.
Dips: Salsa, guacamole, spicy mayo, or tzatziki.
Meals: Add as a side to pasta, grilled chicken, or roasted vegetables.
Frequently Asked Questions (FAQs)
1. Can I use ricotta instead of cottage cheese?
Yes, but ricotta is softer and may need more flour or breadcrumbs to bind properly.
2. Can I make them dairy-free?
You can substitute with a dairy-free cottage cheese alternative and adjust seasonings.
3. How do I store leftovers?
Refrigerate in an airtight container for up to 3 days. Reheat in an oven or air fryer for best results.
4. Can I freeze cottage cheese sticks?
Absolutely. Freeze before cooking for up to 2 months. Cook directly from frozen.
5. Are they good for weight loss?
Yes! Baked versions are low in calories, high in protein, and very filling.
Final Thoughts – Why You’ll Love These Cottage Cheese Sticks
Savory Zucchini Fritters with Cheese and Olives
Zucchini fritters are a delightful dish that perfectly showcases the versatility of zucchini. They are crispy on the outside, tender on the inside, and packed with flavor. This Savory Zucchini Fritters with Cheese and Olives recipe combines grated zucchini with onions, eggs, cheese, and olives for a deliciously unique twist. Whether served as an appetizer, a side dish, or a light meal, these fritters are sure to impress.
The beauty of this dish lies not only in its taste but also in its simplicity. Made with just a handful of ingredients, it’s perfect for both beginner cooks and experienced chefs looking for a quick and healthy option. Plus, zucchini is a fantastic way to sneak some extra vegetables into your diet! Let’s dive into the recipe and discover how to make these delicious fritters step by step.
Full Recipe:
Ingredients
To prepare Savory Zucchini Fritters with Cheese and Olives, you will need the following ingredients:
Zucchini: 1 medium-sized
Salt: To taste
Onion: 1 medium, finely chopped
Egg: 1 large
Dried garlic: To taste
Flour: 4 tablespoons (all-purpose or whole wheat)
Olive oil: For frying
Cheese: 60 grams (feta, mozzarella, or any cheese of your choice), crumbled or grated
Tomato paste: 1 tablespoon
Olives: 30 grams, sliced (green or black, depending on preference)
Parsley: A handful, chopped, for garnish
Steps on How to Make Savory Zucchini Fritters
Step 1: Prepare the Zucchini
Grate the Zucchini: Start by washing and trimming the ends of the zucchini. Using a box grater or a food processor, grate the zucchini finely.
Season with Salt: Place the grated zucchini in a bowl, sprinkle with salt, and mix well. Let it sit for about 10 minutes. This process draws out excess moisture from the zucchini, which helps prevent soggy fritters.
Squeeze Out the Excess Liquid: After 10 minutes, take the grated zucchini and transfer it to a clean kitchen towel or cheesecloth. Squeeze out as much liquid as possible to ensure a firmer fritter texture.
Step 2: Mix the Ingredients
Combine Other Ingredients: In a mixing bowl, add the squeezed zucchini, finely chopped onion, and the egg. Mix well to combine.
Add Seasonings and Flour: Season the mixture with dried garlic, adding salt to taste. Then, add 4 tablespoons of flour to help bind the fritters together. Mix until all ingredients are evenly incorporated.
Add Cheese and Olives: Gently fold in the crumbled cheese and sliced olives, ensuring they are evenly distributed throughout the mixture.
Step 3: Fry the Fritters
Heat the Olive Oil: In a non-stick frying pan, heat a few tablespoons of olive oil over medium-low heat. You want enough oil to coat the bottom of the pan to help achieve a crispy exterior.
Spread the Mixture: Once the oil is hot, use a spoon or small ice cream scoop to drop portions of the zucchini mixture into the pan. Flatten them slightly with the back of the spoon to form patties.
Cook the Fritters: Fry the fritters on low heat for about 5 minutes on each side or until they are golden brown and cooked through. Avoid high heat, as this can cause the outside to burn before the inside is fully cooked.
Flip the Fritters: To flip the fritters, use a large plate. Place the plate over the pan, carefully invert the fritters onto the plate, and then slide them back into the pan to cook the other side.
Step 4: Serve
Prepare for Serving: Once the fritters are cooked and golden brown on both sides, transfer them to a paper towel-lined plate to absorb any excess oil.
Garnish: Serve the fritters warm, garnished with freshly chopped parsley. You can also add a dollop of sour cream or yogurt for extra creaminess and flavor.
Nutrition Facts (Per Fritter)
Here’s an approximate nutritional breakdown for one fritter (based on making about 8 fritters):
Calories: 100 kcal
Carbohydrates: 10 g
Protein: 4 g
Fat: 5 g
Saturated Fat: 1 g
Fiber: 1 g
Sugar: 1 g
These fritters are a great source of vegetables and can provide a balanced amount of protein and healthy fats, especially when paired with a yogurt dip.
MOUSSAKA (Greek Eggplant Casserole)
⸻
Ingredients:
For the Eggplant Layers:
• 3 large eggplants (about 2–2.5 lbs total)
• Olive oil for brushing or frying
• Salt
Optional Potato Layer:
• 2 large potatoes, peeled and sliced ¼ inch thick (optional)
⸻
For the Meat Sauce:
• 2 tablespoons olive oil
• 1 medium onion, finely chopped
• 2 garlic cloves, minced
• 500g (about 1 lb) ground beef or lamb (or a mix)
• 400g (14 oz) canned crushed tomatoes
• 2 tablespoons tomato paste
• ½ cup red wine (optional but traditional)
• 1 teaspoon sugar
• 1 cinnamon stick (or ¼ tsp ground cinnamon)
• ¼ teaspoon ground allspice (optional)
• Salt and black pepper to taste
• 2 tablespoons chopped fresh parsley (optional)
⸻
For the Béchamel Sauce:
• 4 tablespoons butter (60g)
• 4 tablespoons all-purpose flour (30g)
• 3 cups whole milk (warm)
• A pinch of nutmeg
• Salt and white pepper to taste
• 2 eggs, lightly beaten
• ½ cup grated Kefalotyri or Parmesan cheese
⸻
Instructions:
⸻
The Best Crispy Roast Potatoes Ever
Roast potatoes are a classic side dish, beloved for their crispy exterior and fluffy interior. With the advent of air fryers, achieving the perfect crispy roast potatoes has become easier and quicker than ever. This guide will show you how to make the best crispy roast potatoes ever using your air fryer, ensuring a deliciously golden-brown result every time.
Ingredients
To make the best crispy roast potatoes, you will need the following ingredients:
- 2 pounds of potatoes (Russet or Yukon Gold are ideal)
- 2 tablespoons of olive oil (or vegetable oil)
- 1 teaspoon of sea salt (adjust to taste)
- 1/2 teaspoon of black pepper
- 1 teaspoon of garlic powder (optional)
- 1 teaspoon of dried rosemary or thyme (optional for added flavor)
Instructions
Lemon & Garlic Chicken Bites
Looking for a quick and flavorful dinner idea? These Lemon & Garlic Chicken Bites are juicy, zesty, and ready in just 20 minutes! Perfect for busy weeknights, this one-pan chicken recipe is packed with savory herbs, fresh lemon, and buttery garlic. It pairs perfectly with rice, pasta, or roasted veggies.Fresh lemon juice
Ingredients:
1 pound boneless, skinless chicken breasts – patted dry and cut into 1-inch pieces
½ teaspoon dried oregano
½ teaspoon dried basil
2 tablespoons fresh parsley – finely chopped
½ teaspoon kosher salt
¼ teaspoon ground black pepper
4 tablespoons unsalted butter – divided
2 tablespoons minced garlic (about 4 cloves)Kitchen ingredients box
Juice of ½ a lemon (approximately 2 tablespoons)
Instructions:
Easy Air Fryer Egg on Toast
This Lemon Custard Cake brings together a soft, lemony cake base with a silky homemade custard filling. Perfect for any occasion, this dessert is light, fragrant, and just the right balance of sweet and tart. The freshness of the lemon zest combined with the rich vanilla custard makes this cake irresistible for lemon lovers and dessert enthusiasts alike.
Preparation Time:
Prep Time: 20 minutes
Cook Time: 30 minutes
Cooling Time: 1 hour
Total Time: 1 hour 50 minutes
Ingredients:
For the Cake:
1 egg
½ cup | 80g sugar
⅓ cup | 80ml sunflower seed oil
Zest of 1 lemon
1½ cups | 180g flour
1 tsp | 5g baking powder
3 tbsp | 40ml milk
For the Custard Filling:
1 egg yolk
4 tbsp | 50g sugar
1 tsp | 8g vanilla sugar or vanillin
2 tbsp | 30g corn starch
1 cup | 240ml milk
Juice of ½ lemon
For Garnishing:
Powdered sugar, for dusting
Directions:
Fried Cabbage with Bacon
Fried Cabbage with Bacon Ingredients: 6 slices bacon, chopped 1 medium head cabbage, cored and chopped 1 small onion, diced 2 cloves garlic, minced
6 slices bacon, chopped
1 medium head cabbage, cored and chopped
1 small onion, diced
2 cloves garlic, minced
1 tsp salt
½ tsp black pepper
½ tsp paprika (optional)
¼ tsp crushed red pepper flakes (optional for heat)
Instructions:
Vegetable Detox Soup (Diabetes-Friendly & Light)
A simple, low-calorie, veggie-rich soup great for balanced eating.
Ingredients
2 medium potatoes, diced
1 large carrot, sliced
1 bell pepper (any color), diced
1–2 cups chopped cabbage
2 celery stalks, sliced
1 medium onion, chopped (optional but recommended)
2–3 garlic cloves, minced