TENDER AND JUICY GARLIC BUTTER STEAK BITES

HOW TO MAKE TENDER AND JUICY GARLIC BUTTER STEAK BITES
This mouthwatering recipe for Tender and Juicy Garlic Butter Steak Bites will treat your taste buds to a symphony of flavors, and they will thank you for it. This meal creates a delectable sensation by combining tender pieces of steak with creamy garlic butter, which results in an encounter that will leave you wanting more.
In the world of culinary art, these Tender & Juicy Garlic Butter Steak Bites are a tribute to the union of simplicity and indulgence. Each mouthful is a marvel of taste thanks to the steak’s flawlessly grilled exterior and the silky garlic butter sauce that coats it. This meal is sure to make a lasting impression on the diner, whether it is consumed in the company of those dear to you or on one’s own. This dish will take your home-cooked meals to a whole new level, and you’ll love the enchantment it brings to the table. This dish is a certain way to dazzle your visitors at parties or a special supper for two, and it will also fulfill your demands for a substantial and tasty meal. It is perfect for gatherings or dinners for two.
INGREDIENTS NEEDED:

1 Lb.Of top sirloin steak, cut into bite-sized pieces.

4 garlic cloves; minced.

4 Tbsp.Of unsalted butter.

2 Tbsp.Of olive oil.

Salt and freshly ground black pepper, to taste.

Fresh parsley, for garnish (optional).

Read more

Lunch-lady-brownies

How To Make Lunch-lady-brownies
Hello foodies, put on your aprons and fasten your seatbelts because we’re about to embark on a chocolatey rollercoaster ride that will leave you begging for more. Today, I present to you a dessert so incredibly tempting. Get ready to meet the mischievous and utterly irresistible recipe Lady Brownies!!
Now, picture this: it’s a sunny day, and you’re back in the hallowed halls of your old school. Memories flood your mind—dodging dodgeballs in gym class, trading stickers with friends, and of course, lining up for lunch. Ah, yes, the lunch lady—she’s a mythical creature, half magician, half comedian, and fully equipped with a never-ending supply of delicious treats. These Lunch Lady Brownies are the stuff of legends, whispered about in hushed tones among students, traded like precious currency, and guarded with the utmost secrecy by those in the know. They are the secret weapon of the lunch lady, a culinary masterpiece that has brought joy, comfort, and a touch of mischief to generations of students.
What makes these brownies so special, you ask? Well, imagine sinking your teeth into a velvety soft brownie, with a delicate crackly top that gives way to a fudgy center that melts in your mouth. The chocolatey goodness is punctuated by bursts of slightly crunchy walnuts, adding a delightful texture and nutty flavor that takes these brownies to a whole new level. But here’s where the Lunch Lady Brownies truly shine—their ability to transport you back to the carefree days of your youth. One bite is all it takes to ignite a flood of nostalgia, whisking you away to the schoolyard, where friendships were forged, games were played, and the lunch lady was an unsung hero, creating moments of pure bliss with every batch of brownies.
So, my friends, it’s time to unleash your inner lunch lady and whip up a batch of these enchanting brownies. Prepare to be transported back in time, to a place where laughter echoed through the hallways, and the most important question of the day was whether you’d score an extra brownie from the lunch lady’s secret stash. With every decadent bite, savor the memories, the mischief, and the sheer delight that the Lunch Lady Brownies bring. They are a reminder that sometimes, the most cherished recipes are found in the unassuming corners of our lives, created by those who possess a sprinkle of magic and a pinch of mischief. So, my fellow dessert adventurers, let’s don our aprons, gather our ingredients, and dive headfirst into the whimsical world of Lunch Lady Brownies. Get ready for a wild and chocolatey ride that will leave you with a grin on your face, a belly full of joy, and a newfound appreciation for the lunch ladies who’ve been delighting our taste buds all along. Let the baking begin!!

Read more

With these 3 effective tips reviving your orchids is simple

With these 3 effective tips reviving your orchids is simple
Welcome, everyone!
Symbolizing the fourteenth year of marriage, the orchid represents the promise of a radiant future within the tapestry of our floral story!! Yet, their fragile disposition demands diligent nurturing to sustain their perpetual blossoming and encourage the birth of fresh buds.
Orchids Reborn:

Embarking on a Path to Sustained Blossoming.

Hydrating and Feeding:

In contrast to infrequent watering, orchids thrive on regular hydration. Change their water every two days and provide them with a bi-weekly dose of liquid fertilizer to maintain their vitality.

Embracing Sunlight:

Orchids eagerly reach for the sun, drawing strength from the soft autumn rays, which unlock their potential to unfurl vibrant blossoms once more.

Temperature Play:

Unexpectedly, orchestrating a delicate interplay of warm and cool environments for your orchids can invigorate them, encouraging the growth of fresh stems. By alternating their surroundings every two weeks, you ensure they don’t wither under excessive heat
Orchids Reborn:

Embarking on a Path to Sustained Blossoming.

Read more

BAKED CAJUN SHRIMP: A Spicy Seafood Delight

HOW TO MAKE BAKED CAJUN SHRIMP: A Spicy Seafood Delight
Baked Cajun Shrimp is the meal to choose if you’re looking for one that will excite the taste buds with a rush of robust flavors and is the solution to your search. The recipe creates a meal that is fiery, flavorful, and completely impossible to resist by using luscious shrimp and dousing them in a zesty Cajun marinade. This dish takes little time to make and even less time to vanish from the plate, making it an absolute must-try for anybody who enjoys seafood as well as those who are partial to spicy foods.
This recipe is a spicy celebration of Cajun tastes, and the natural sweetness of the shrimp is the ideal balance to the spiciness of the dish. Your taste buds will be doing a happy dance as a result of the symphony of flavors that are produced when citrus, herbs, and spices are combined. Baked Cajun Shrimp is bound to become a star among the seafood dishes in your repertoire since it is speedy, simple, and extremely scrumptious.
THE INGREDIENTS LIST:

1 Lb.Of large shrimp (peeled and deveined).

3 Tbsp.Of olive oil.

2 Tbsp.Of Cajun seasoning.

2 Tbsp.Of lemon juice.

3 garlic cloves – minced.

1 Tsp.Of paprika

1 Tsp.Of dried thyme

1 Tsp.Of dried oregano

Salt and black pepper to taste

Read more

PORK ADOBO RECIPE

Try this melt in your mouth Pork Adobo Recipe with a perfect balance of saltiness, and acidity. Slow-cooked and then sauteed in browned garlic for richer and fuller flavors.

Prep Time: 5minutes mins

Cook Time: 1hour hr 15minutes mins

Total Time: 1hour hr 20minutes mins

INGREDIENTS

US CustomaryMetric

  • 1 ½ pounds pork belly – cut into 1×1 or 1×2-inch cubes
  • ⅓ cup dark soy sauce
  • ½ cup vinegar
  • 1 cup water
  • 10-12 pieces peppercorn
  • 3 pieces bay leaves
  • 1 teaspoon brown sugar – optional
  • 1 big onion – chopped coarsely
  • 2 tablespoons oil
  • 5 cloves garlic – minced

Read more

“AMISH POOR MAN’S STEAK” RECIPE

HOW TO MAKE “AMISH POOR MAN’S STEAK” RECIPE
The Amish cuisine is well-known for being simple and relying on natural, unprocessed components wherever possible. The “Poor Man’s Steak,” often referred to as “Cube Steak with Onion Gravy,” is a traditional Amish meal that exemplifies these tenets. This dish takes a cheap piece of pork and turns it into a tasty, comfortable meal that is ideal for supper with the family because of its rustic and hearty nature.
This recipe for Amish Poor Man’s Steak captures the spirit of Amish cuisine, which is transforming simple materials into a dinner that is both gratifying and tasty, and which is guaranteed to delight its eaters. The cube steaks are both delicate and tasty, and the onion gravy provides a level that is both comforting and savory. Together, these elements make this meal a classic favorite that will stand the test of time. Savor the heritage of Amish culinary skills while indulging in this delicious supper that won’t break the bank with your loved ones and make memories that last a lifetime.
THE INGREDIENTS NEEDED:

FOR THE STEAK:

4 cube steaks (usually round steak that’s been tenderized).

1 Cup.Of all-purpose flour.

1 Tsp.Of salt.

1/2 Tsp.Of black pepper.

1/2 Tsp.Of paprika.

2 Tbsp.Of vegetable oil.

FOR THE ONION GRAVY:.

2 large onions, thinly sliced.

2 Tbsp.Of butter.

2 Tbsp.Of all-purpose flour.

2 Cups.Of beef broth.

Read more

Birria Wings with Consome

1. Make the glaze, in a small bowl, whisk the sauces, sesame oil and ginger together.

2. Trim excess skin from the edges of the wings.

3. Lightly brush or spray with the oil, and season with salt and pepper to taste.

4. Grill the chicken wings over Direct Medium heat until the skin begins to crisp, about 10 minutes, turning once or twice.

5. Brush the wings with the glaze and continue to grill until the meat is no longer pink at the bone, 8 to 10 minutes, turning and brushing with the glaze 2 or 3 times.

Read more

Skillet Chicken Pot Pie

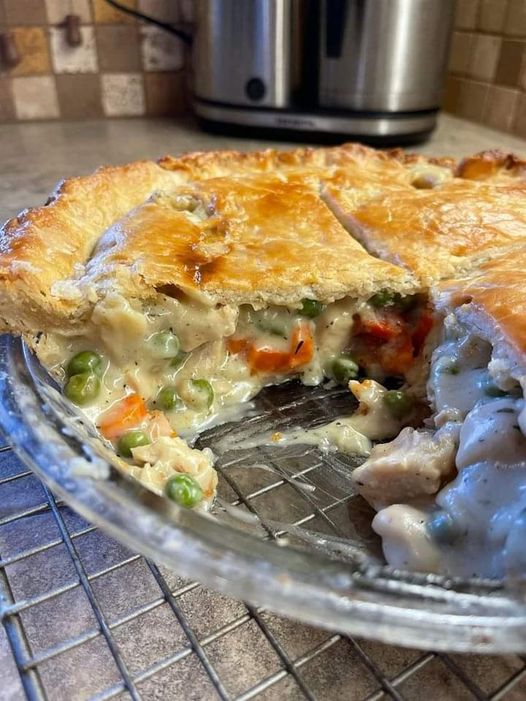
This homestyle comforting and hearty Skillet Chicken Pot Pie is unbelievably good! Topped with a flakey golden pastry crust, it’s full of tender chunks of chicken, potatoes, and lots of veggies in a creamy mushroom sauce. This is the ultimate busy weeknight recipe that your whole family is sure to love!
Easy Skillet Chicken Pot Pie Recipe
You no longer have to feel your tastebuds drool and your mind dread when you hear the words, homemade chicken pot pie recipe!?! Because you know how good it is, but you also know how much work it takes to make a traditional pot pie. Who has time to make pie crust?!? Not me! And probably not you.

But I love pot pie, so I’ve become a pro at finding ways to make them just as tasty, but with a lot less steps. And that’s what we’ve got here! Just like my Beef Pot Pies, this skillet chicken pot pie recipe uses store-bought puff pastry, which is a huge time saver and just as delicious. The recipe also incorporates a can of cream of mushroom soup into the filling with the sauteed veggies, potatoes, and tender chicken breast. This gives it a lovely consistency and another layer of flavor without much effort making it another time saver.
Super Easy! This one pan wonder is the easiest chicken pot pie recipe you will ever find! By using store-bought pastry and a can of soup this recipe can be made in a little over an hour.
Homestyle Deliciousness! Big chunks of chicken are coated in a delicious creamy sauce and then topped with a golden pastry crust to make my version of this classic comfort food.
Family Favorite! When we think of chicken pot pie we think of a hearty wholesome family dish. This simple recipe is an affordable crowd-pleaser that does not disappoint.
Olive Oil – I like to use olive oil, but you can use any type of vegetable oil.
Onion – Brown onion adds the most flavor, but any onion you have on hand will work.
Celery – A classic pot pie veggie used to add flavor.
Chicken – You will need boneless skinless chicken breasts. You can also use boneless skinless chicken thighs if you prefer.
Salt and Pepper – Used to season the whole chicken pot pie.
Red Pepper Flakes – Adds just a touch of heat to the filling.
Thyme – Use fresh thyme for the most aromatic herb flavor.
Frozen Peas and Carrots – You do not need to defrost the peas and carrots. In fact, they should be added while still frozen.
Potatoes – Any type of potato can be used. Just make sure that they are cut into pieces that are all about the same size.
Cream of Mushroom Soup – Any brand of cream of mushroom soup works perfectly.
Chicken Broth – To control the amount of added salt I always use low-sodium broth.
Parsley – Fresh parsley is a must for this dish.
Puff Pastry – I used store-bought puff pastry to make this pot pie recipe super easy.
Egg – Needed to make a simple egg wash.
This pot pie recipe is the definition of the perfect quick and easy weeknight family meal! The entire dish is made in one pan and ready to be served in just over an hour!

Preheat The Oven
This chicken pot pie comes together quickly and you want the oven to be ready to go. So before you even begin the recipe, preheat your oven temperature to 350°F (177°C). This will give the oven an adequate amount of time to heat up while you prep the pie
Now, to get the filling started, heat the olive oil over medium heat in a large oven-safe skillet like a cast iron skillet. Then add the onions and celery to the pan and sauté them for about 3 minutes or until the onion is soft and translucent.
Next, add the chicken pieces to the skillet. Then sprinkle the chicken with the salt, pepper, red pepper flakes, and fresh thyme. Now, stir everything together and cook the chicken for 5 minutes or until it’s no longer pink
After the chicken mixture has been sautéed, add the frozen peas and carrots along with the potatoes to the skillet. Then stir everything together and cook the mixture for 5 minutes. Now, mix in the cream of mushroom soup, chicken broth, and fresh parsley.
With the filling made, you can now add the pastry crust. All you have to do is lay the sheet of puff pastry over the filling in the skillet and then tuck in the edges of the pastry. Then brush the top with a bit of egg wash and cut a few slits in the center of the pot pie with a sharp knife.
Once the pie has been assembled, transfer it to the preheated oven to bake for 45 minutes or until the crust is golden brown. Then remove the skillet chicken pot pie from the oven and allow it to sit for 5 minutes before slicing into it to serve.
Can I Make This Recipe In A Pie Dish?
Yes! Just follow the recipe and make the chicken pot pie filling in the skillet on the stove top. Then when it comes time to add the pastry crust, transfer the filling into a pie dish and then top it with the puff pastry. Now, just finish the recipe and bake the pot pie in the pie dish.

Why Is My Chicken Pot Pie Watery?
If your pot pie turns out watery or seems runny you probably didn’t let it bake long enough for the filling to thicken up in the oven. So if the crust begins to brown too fast before the pie is ready to come out, just cover it with a sheet of foil to keep it from burning.
Storage
Leftover chicken pot pie can be stored in the refrigerator or freezer.

Let the chicken pot pie cool down to room temperature before storing it. This will prevent the formation of moisture that can cause bacterial growth.
Divide the chicken pot pie into individual portions, if possible, for easier reheating and to avoid wastage.
If storing in the refrigerator, place the chicken pot pie in an airtight container and store it in the refrigerator for up to 4 days.
If storing in the freezer, wrap the chicken pot pie in plastic wrap or aluminum foil and place it in a freezer-safe container or bag. Label the container or bag with the date and contents and store it in the freezer for up to 2-3 months.
To reheat the chicken pot pie, preheat the oven to 375°F (190°C), place the pot pie on a baking sheet, and heat it for 25-30 minutes, or until it is heated through and the crust is crispy. Alternatively, you can reheat it in the microwave, but be sure to cover it with a damp paper towel to prevent it from drying out.

Read more

Yes, vinegar helps clean the washing machine thoroughly: here’s how to use it

The washing machine requires hours and hours of manual labor. As a result, since its advance, there is no longer any need to climb as much as it has become inevitable. Although she herself saved a few hours and perseverance, she managed to take precautions quietly and quietly. Intellect so we share with you tips that are both effective and helpful for white vinegar to link your machine into a good list.

1. What is the variation in which you need to take care of the washing machine?
2. 1. Start by washing the loose tons
3. 2. Use vinegar to clean the battery of your washing machine
4. 3. Cleaning the face of the washing machine
5. White vinegar to clean your entire room
6. Subject on the influence of pale vinegar
7. 1. Purification of the watering ball
8. 2. Commit to shining the mess

9. 3. Commit to making windows and mirrors shine
10. 4. Audit of pipes and water closets
11. 5. Purification of ewer and faucets
12. 6. Purification of the floor and paving
13. Preserved effects on the application of pale vinegar

Read more